Way 1. Use the Top-right Search Bar in File Explorer
It’s tricky that you will find the Rename option to rename the user folder in Windows 10 if you follow the operation below.
- You can go to C drive (the OS drive) -> Users folder.
- Then click the search box at the upper-right in File Explorer, and search the user folder name you want to change.
- In the search result list, find the user folder and right-click it and you will see the Rename option. Click Rename to change the name for the user folder in Windows 10.

If you are wondering how to change c/users/username in Windows 10, you may try this way.
But some people find that this only changes the user folder name, but not the user account name. If you search a file in the user folder, you will find that the user folder name in the directory is still the old one. To really change user account name in Windows 10 and rename the user folder, you can try Way 2.
Attention: Changing user folder name or editing the Registry is risky and may cause data loss. Do at your own risk. You can make a backup of your Windows OS and important data with free backup tool like MiniTool ShadowMaker. You can also create a system restore point to easily restore Windows 10 OS if something bad happens.
Way 2. Change User Folder Name in Windows 10 with Registry Editor
This way is a little bit complicated, but you can try if you really want to rename a Windows 10 user folder.
Step 1. Create a new local user account.
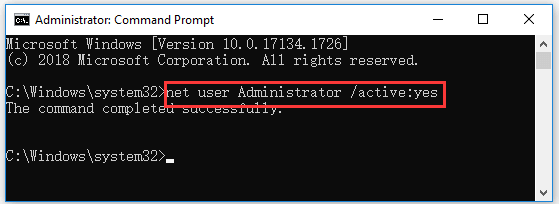
You can press Windows + R, type cmd, and press Ctrl + Shift + Enter to open elevated Command Prompt in Windows 10.
Type net user Administrator /active:yes command, and press Enter to execute the command to create a new Administrator account.

Step 2. Log in the Administrator account.
Next you can click Start -> User -> Sign out to sign out the current user account. Then select the Administrator account that you created to log in.

Step 3. Rename the user folder in OS drive.
Then you can open C drive on your computer and open Users folder. Right-click the target user folder and rename it.
Step 4. Change c/users/username in Registry Editor.
Now you can press Windows + R, type regedit, and press Enter to open Registry Editor in Windows 10.
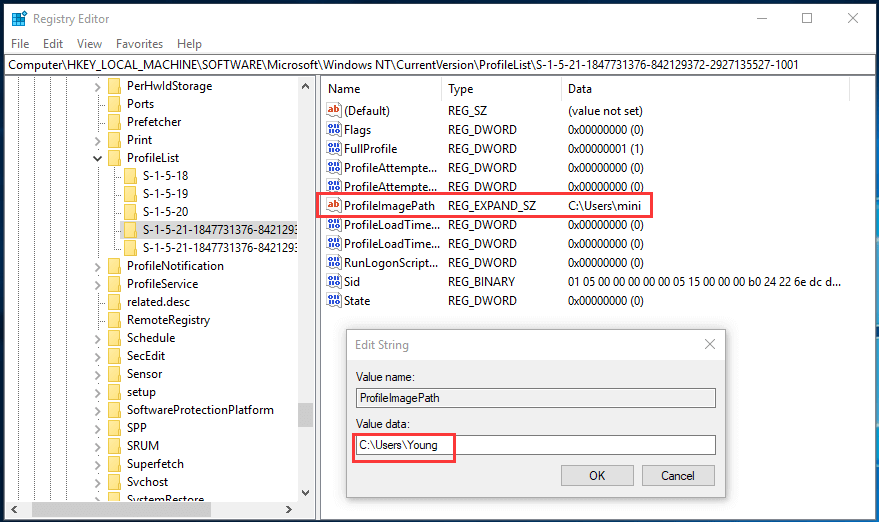
In Registry Editor window, you can expand the folder in the left panel as the following path: HKEY_LOCAL_MACHINE\SOFTWARE\Microsoft\Windows NT\CurrentVersion\ProfileList\<User SID>\.
If you find several User SIDs and don’t know which one to change, you can click each User SID and check its values in the right window to find the right one with the target user folder name you want to change.
Click the User SID and double-click ProfileImagePath key in the right window. Then you can input the new user folder name at the end of the directory under Value data. Click OK to save the changes. Restart your computer to make the changes take effect.

Attention: Before you edit the registry, it’s highly advised you back up Windows 10 Registry first in case something goes wrong.
Step 5. Change user profile folder name in User Accounts window.
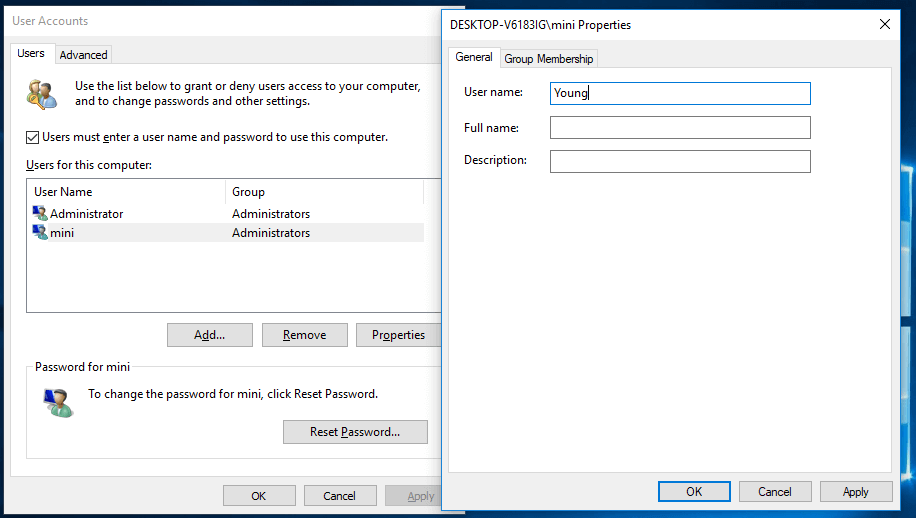
Next you press Windows + R, type netplwiz in Run dialog, and press Enter to open User Accounts window.
Select the target user account, and click Properties to open its properties window. Change your user name. You can copy the new user name in File Explorer and paste it into the box to avoid wrong input. Click Apply and click OK to save the setting.

Step 6. Sign in with the new user account.
Then you can click Start -> User -> Sign out to sign out Administrator account. Then select the user account with the new name to sign in.
Step 7. Delete the Administrator account.
At last, you can press Windows + R, type cmd, and press Ctrl + Shift + Enter to run Command Prompt as administrator again. Type the command net user Administrator /active:no in Command Prompt, and press Enter to delete the Administrator account you created in Step 1.


No comments:
Post a Comment