After login from Windows 10, go to the search bar held at the left-most corner of the desktop screen. Write “Windows PowerShell” in it and click the Enter key. The Windows Powershell App will be displayed. Open it by clicking on it. After a while, the Windows PowerShell will appear on your screen as presented below.
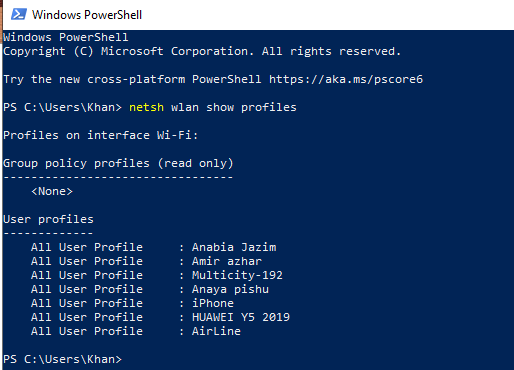
Now first of all you need to see the list of networks your PC has ever been connected to. For that purpose, write the cited below command in the Windows Power Shell. This command is presenting “wlan” network profiles to be shown on your power shell screen. You will get a list of Wi-Fi you have ever been connected to, as presented in the snapshot image below.
You have to choose one, which you want to see the password. Let suppose, we want to see the password for the Wi-Fi connection “Anabia Jazim”. Hence, we have to use this name in our further instructions within the Windows Power Shell.
netsh wlan show profiles

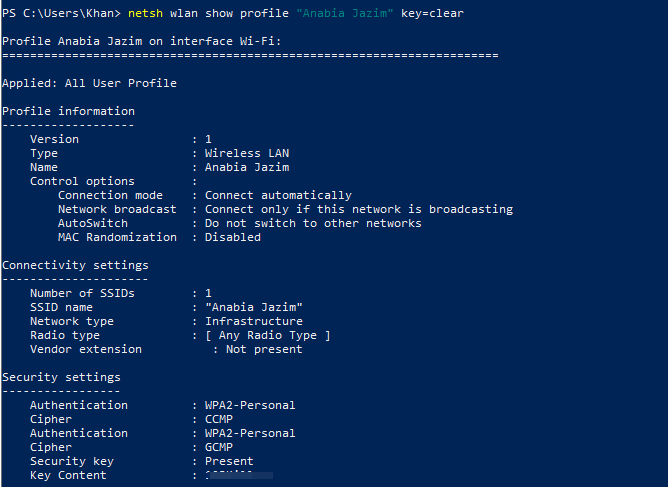
Now, we have to use another query in the Power Shell of Windows 10 to see the password of our specific Wi-Fi. We have chosen “Anabia Jazim” for the sake of finding its password. Instruction will remain the same with a little change. Hence, we have tried the below query in the Power Shell along with the Wi-Fi name mentioned in it. Don’t forget to mention “key=clear”. Hit the Enter button to see the results.
netsh wlan show profiles “Anabia Jazim” key=clear
It will show you some information regarding Wi-Fi “Anabia Jazim”. In the output, within the Security settings of Wi-Fi, As the value of “Key Content”, you can see your Wi-Fi password.


No comments:
Post a Comment