Microsoft recently released Windows 10 v20H2 to its stable release channel. As we are all familiar with Microsoft’s history, many of us are reluctant to upgrade to this version just yet, as it is bound to have many bugs and flaws. However, Microsoft does not allow a regular user to stop automatic Windows updates like Windows 7.
If you want to block Windows 10 October 2020 Update (Version 20H2), you can follow this guide.
Pause updates for 7 to 35 days
Users can pause their Windows Update service from 7 to 35 days, depending on how long they want to pause. This will pause all features and security updates for a set time period.
- Navigate to the following:
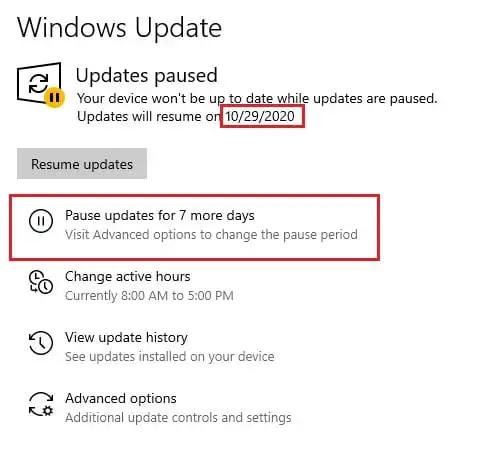
Start Menu -> Settings -> Update & Security -> Windows update - Now click on Pause updates for 7 days. You can then see the date when the updates will resume at the top.

- You can now continue to click Pause updates for 7 more days 4 more times (5 in total), which adds 7 more days to the date when the updates will automatically resume. The image below gives a date of 35 days from now after clicking the pause button 5 times:

This approach will prevent your Windows 10 version from upgrading to 20H2 for a maximum of 35 days only. After that, Windows will begin to download all updates as usual. You can also resume downloading the updates by clicking on Resume updates in the Windows update window.

Postpone all feature updates for up to 365 days using Group Policy
You can use the Group Policy Editor to stop your Windows 10 from updating to v20H2 for up to a year! If you are running the Home edition, you will not have a Group Policy Editor by default. Here is how you can install the Group Policy Editor on the Home edition of Windows 10.
- Open Group Policy Editor by typing in gpedit.msc in Run.
- Now navigate to the following from the left pane:
Computer Configuration -> Administrative Templates -> Windows Components -> Windows Update -> Windows Update for Business - Now double-click Select when Preview Build and Feature Updates are received in the right pane.

- In the pop-up window, select Enabled, and then type in the number of days you want to stop receiving updates for your OS in the Options portion. Note that the maximum limit is 365 days. Click on Apply and Ok.

- Now type in the following command in Command Prompt to make the changes occur:
gpupdate /force
Your computer will now stop receiving automatic Windows updates for the said amount of days. To check that the settings have been applied, you can navigate to the Windows Update page in the Settings app and see a message stating “Some settings are managed by your organization.”

To revert the changes, you’ll need to select Disabled from the same policy setting and then select Not Configured.

Enforce PC to stay on the current build using the Group Policy Editor
You can also force your computer to stay on the current version of your Windows 10. This is also achieved through the Group Policy Editor.
- Launch the Group Policy Editor by typing in gpedit.msc in Run.
- Now navigate to the following from the left pane:
Computer Configuration -> Administrative Templates -> Windows Components -> Windows Update -> Windows Update for Business - Now double-click Select the target feature update version in the right pane.

- In the pop-up window, select Enabled and then type in the current version of your Windows in the Options portion you had previously checked through the “winver” command. Click on Apply and Ok when done.

- Now type in the following command in Command Prompt to make the changes occur:
gpupdate /force
With this configuration, your OS will stay on the current version while installing Windows updates. Any update that changes the version of Windows 10 will not be installed.

No comments:
Post a Comment