Causes of 100% Disk Usage in Windows 10
There are various causes available that are responsible to generate 100% disk usage issue, some of them are as follows:
- Pending Windows system updates.
- Computer malware and viruses.
- Problematic page file configuration.
- Hardware issues like HDD bad sectors and more.
- Outdated system drivers
- Software malfunctioning.
- Corrupt system files.
Solution 1: Restart Your Computer
Users often restart the PC when the computer screen got froze due to the disk usage issue on Windows 10. As the 100% disk usage issue is no exception, hence can be easily tackled by restarting the computer.
- First, go to the Windows Start button.
- Click on the Power button.
- Select the Restart option.
Once the computer is restarted, the disk usage issue should have solved. But, if you are still facing the issue, then try out the other fixes.
Solution 2: Disable Antivirus Software Temporarily
If there is a third-party antivirus or antimalware software installed on your computer, then disable it temporarily to check if it is causing the 100% disk usage on Windows 10 computer.
If the disk usage in the Task Manager doesn’t show 100% anymore, then you found the cause. Now, contact the antivirus software vendor and ask them for help to resolve this issue.
If you don’t get the vendor help, then don’t worry as you have default antivirus installed on your computer. Yes, you heard it right. Microsoft comes with its default antivirus, Windows Defender.
It is by default running in the background no matter whether another antivirus/antimalware application is installed on your computer or not.
o, even though third-party antivirus software is disabled on the PC, you still have a Windows Defender, which is as equally good as any other antivirus tool.
Solution 3: Update Your Windows 10 Computer
Updating the OS often resolves severe Windows 10 errors and issues. So, make sure your Windows 10 computer is updated. If it is not, then update it right now as it may fix the 100% disk usage on Windows 10 PC.
It’s not only required for this particular issue, but it effectively impacts the overall performance of your PC in order to keep your device error-free and secure. To update Windows 10 computer, follow these steps:
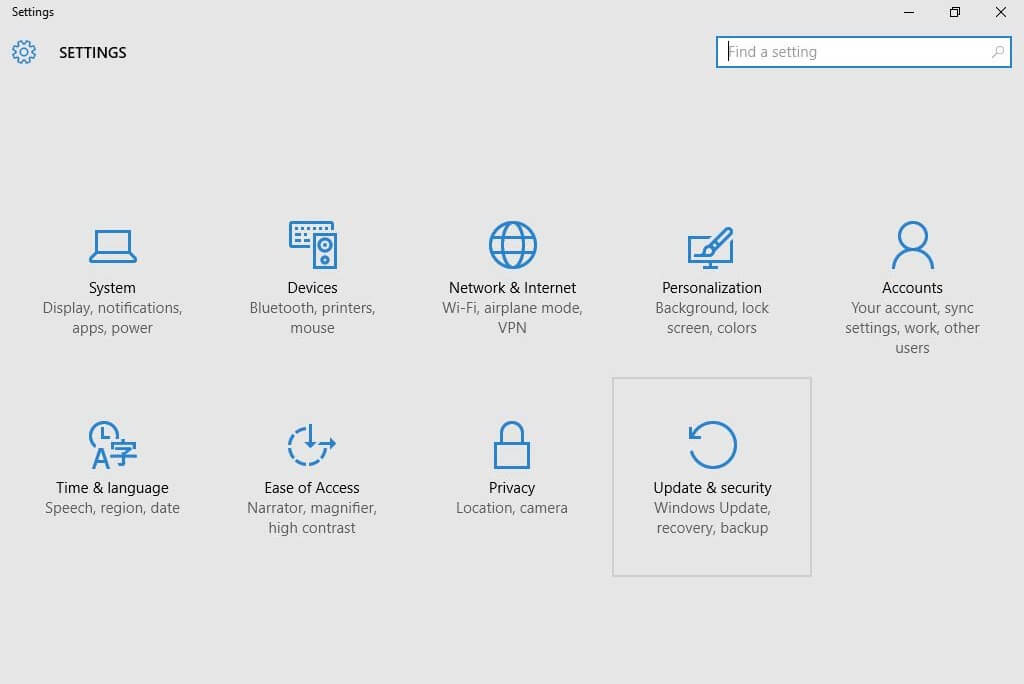
- Press Windows + I key together.
- On the Windows Settings, click on the Update & Security.
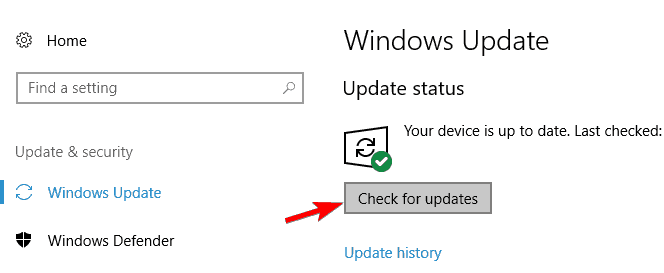
- Now, go to the Windows Update tab located on the left pane of the window.
- Click on the Check for updates button.
- If the update is available, then install it.
This solution is capable of fixing the several issues on your Windows 10 computer including the 100% disk usage issue. So, open the Task Manager and check the disk usage. If it is still 100%, then move to the next solution.
Solution 4: Run Check Disk (CHKDSK)
The Check Disk (chkdsk) command can give you a clear view if there is an issue with the hard drive. Usually, the 100% disk usage problem occurs due to the logical or application issue, but the physical problem with the disk may also turn out as a cause.
To run the chkdsk, follow the given steps:
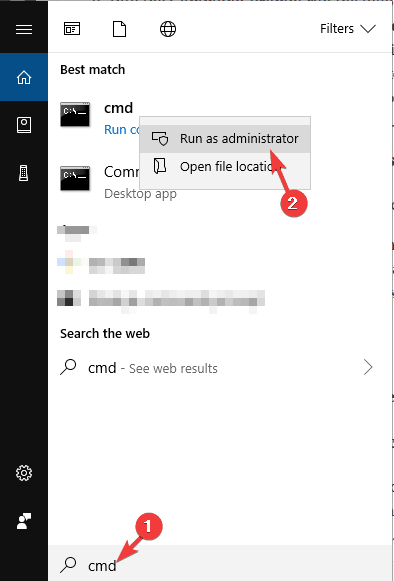
- Go to the Windows Search box and type cmd.
- Right-click on the Command Prompt and select Run as administrator.
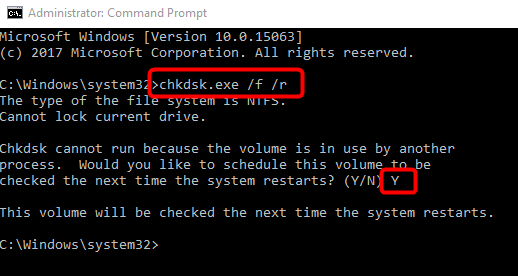
- In the Command Prompt, type this command and press the Enter key:
chkdsk E: /f /r
- Type Y to confirm that you would like to run the disk check next time when the computer will restart.
Solution 5: Stop Superfetch Service
Superfetch service is another potential reason for the 100% disk usage issue on the Windows computer. It is a Windows 10 feature that has been renamed to the SysMain after the Windows 10 2018 October update.
If you don’t have the latest hardware on your computer, then Superfetch service is highly likely to cause the Windows 10 100% disk usage error.
However, it is not a big problem, and you can stop this service on your computer to resolve the issue.
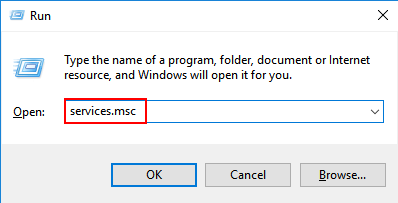
- Press Windows + R key to open the Run dialog box.
- In the Run field, type services.msc and click on the OK button.
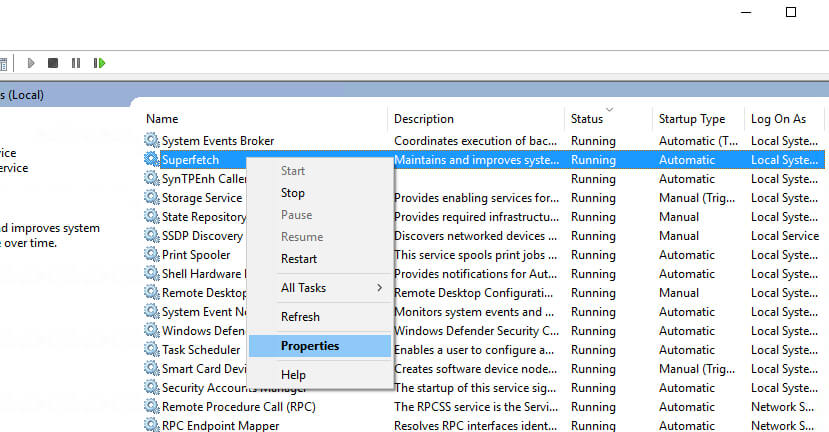
- Now, search for the Superfetch in the Services window and right-click on it.
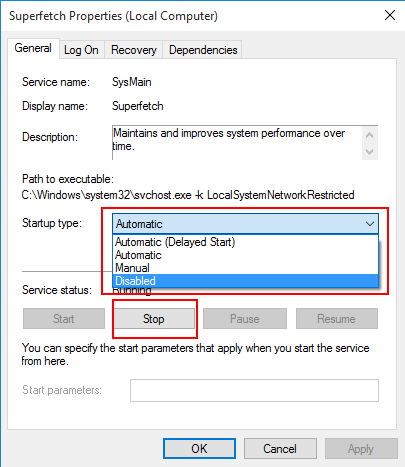
- Select Properties and click on the Stop button.
- Next, choose Disabled from the dropdown located next to the Startup type.
- Lastly, click on the Apply and OK button.
There is also an alternative way to stop the Superfetch service:
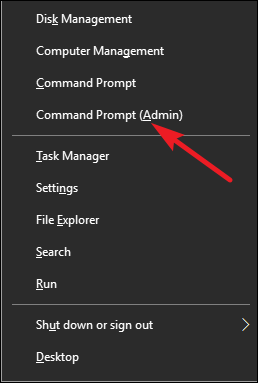
- Press the Windows + X key.
- Click on the Command Prompt (Admin).
- In the Command Prompt, type the below-given command and press the Enter key:
net.exe stop sysmain
Now wait for some time and check if it makes any difference in the disk usage.
Solution 6: Fix StorAHCI.sys Driver
In some case, it is found that Advanced Host Controller Interface PCI-Express (AHCI PCIe) models running with the inbox StorAHCI.sys driver causes the 100% disk usage error in Task Manager.
Hence, to determine whether this is the case with you, follow the below-mentioned steps:
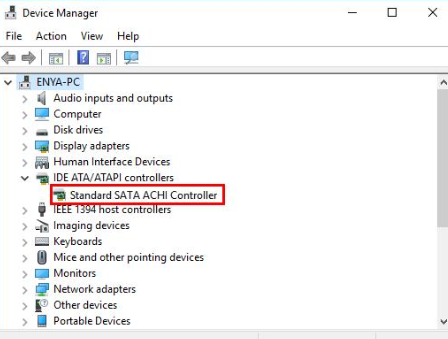
- Go to the Device Manager (Press Windows key and X and select Device Manager).
- Click on the IDE ATA/ATAPI Controllers category to expand it.
- Double click on the AHCI controller.
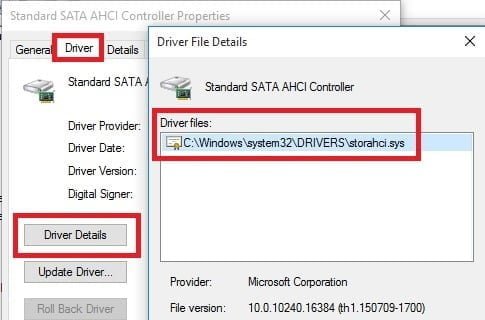
- Now, navigate to the Driver tab and click on the Driver Details.
- Here, if you found storahci.sys stored in a path of system32 folder, then it is confirmed that you are using the inbox AHCI driver.
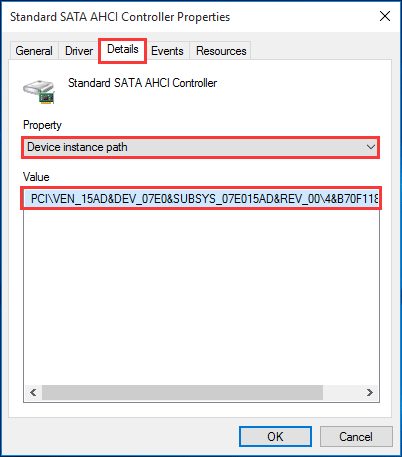
- Exit from the Driver Details window and then go to the Details tab. Click on the drop-down menu and choose Device Instance Path.
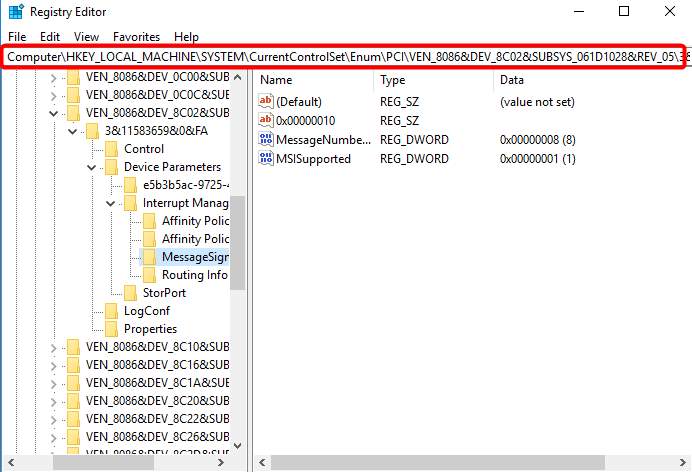
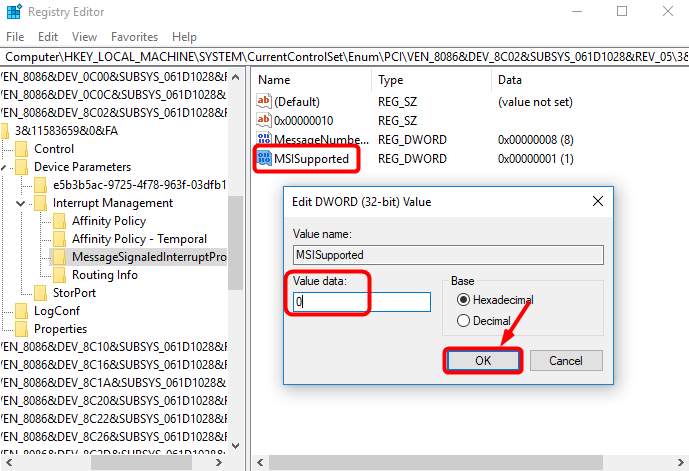
- Now you need to do some operations on the registry editor. To do this, go to the search box and search for the regedit. Select the registry editor from the search result.
- After it navigates to the:
HKEY_LOCAL_MACHINE\System\CurrentControlSet\Enum\PCI\ <AHCI Controller>\<Random Number>\Device Parameters\Interrupt Management\MessageSignaledInterruptProperties
Note: <AHCI Controller> refers to the name of the controller. And, <Random Number> is varied on different systems.
- After it, double click on the MSISupported key and set the value to 0.
- At last, reboot the computer after doing all modifications.
Solution 7: Change Energy Option to High Performance
As per the affected user’s feedback, changing the energy option to the High-Performance fixed their 100% disk usage error on Windows 10 computers.
So, to do this, you need to follow the below-given instructions:
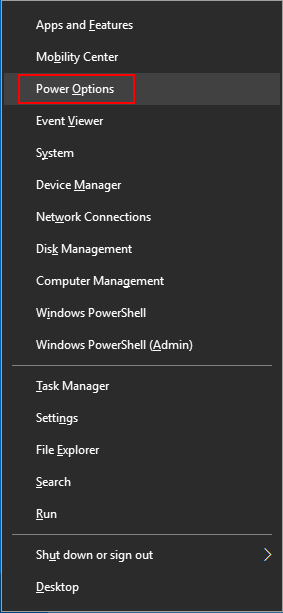
- Press the Windows + X key and click on the Power Options.
- Click on the Additional power settings.
- Select High performance.
- Click on the OK button.




No comments:
Post a Comment