Are you unable to upgrade your system to Windows 10 due to the Error Code 0xC1900208 – 0x4000C?
If your answer is YES then you are in the right place, it is also suggested to apply the given fixes and get rid of this issue as soon as possible.
This update error generally appears because of the incompatible application or program installed on your computer. These incompatible apps, system drivers and other will prevent you from upgrading a computer/Laptop to Microsoft Windows 10. No matter what application is triggering this upgrading error as it will make you completely helpless in upgrading your Windows 10 system and display an error message with an Error Code 0xC1900208 – 0x4000C.
If you are suffering from this issue and want to get rid of this then don’t worry as you can easily deal with it without calling any professional. This blog contains different solutions to get rid of this issue, simply follow them one by one and check for the issue after applying each of them.
Common symptoms include:
- A dialog box will appear with an Error Code 0xC1900208 – 0x4000C
- You are unable to complete the Microsoft Windows 10 upgrade process.
Causes of Windows 10 Upgrade Error Code 0xC1900208
The main cause of Error Code 0xC1900208 – 0x4000C is a non-compatible application or program that is currently installed on your computer. There are several other causes, such as an outdated app, faulty software, outdated system drivers, and more.
Manual Repair to Fix Error Code 0xC1900208 – 0x4000C
The error code 0xC1900208 – 0x4000C is very common and you can easily fix this issue without need of any professional skills. It is recommended that before applying any attempts to fix this error apply a compatibility test.
- Verify that all the installed application is compatible, or if any compatibility issue found then locate and remove the program as soon as possible. After finding one incompatible program doesn’t stop and check all other apps for a compatibility issue.
- Also, make sure that all installed programs and software are not outdated or no longer supported. If any found then remove or fix any outdated or unused, unnecessary programs or software.
- Sometimes checking Windows system drivers is also necessary, make sure that all of your device drivers are updated and compatible with Microsoft Windows 10 if you found any outdated then replace or update it. Update and repair outdated or corrupt system drivers with the help of a professional Windows System Driver Updater tool. This software is very effective and will fix all types of issues that can prevent you from updating your system.
Trick 1: Check for the Compatibility Issue
You can take the help of Microsoft Windows 10 application on your computer to check its compatibility, apply the below-given steps to run the check.
Step 1: At the right side of the taskbar you will see an icon for Microsoft Windows 10, right-click the icon. Find the option in the menu to check the status of your upgrade. This option will open an app for getting Microsoft Windows 10.
Step 2: After it, you will see 3 lines on top of one another in the upper left side, this will open a drop-down menu, from here find the option to check the compatibility of your computer.
Step 3: Microsoft Windows will then automatically run a check of your complete computer to verify compatibility with Microsoft Windows 10. After the completion of this process, you will see a pop-up window that will display whether or not your computer will work with Microsoft Windows 10. In this message, you will also get a list of any hardware and software that are not compatible with the upgrade.
After finding the incompatible applications now you have to remove/uninstall them.
Step 1: Open Control Panel.
Step 2: Select the “Programs”
Step 3: From the options available, choose the ‘Programs and Features’ link.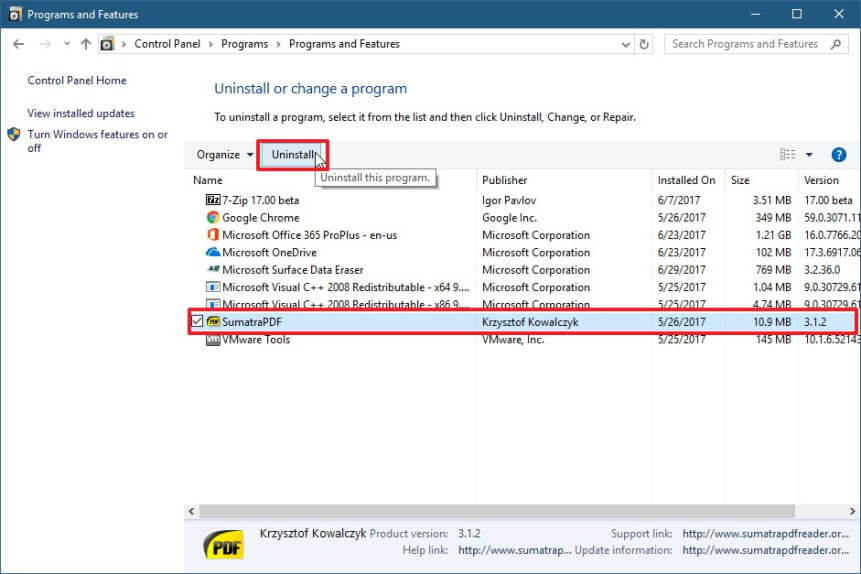
Step 4: Find the app in the queue or menu.
Step 5: Right-click and select the uninstall option.
Trick 2: Perform a Clean Boot
If you are still unable to upgrade to Windows 10 and getting the same error message then you should try to perform a clean boot. This trick will isolate the mismatched or incompatible software. To do this, follow the below-given steps:
Step 1: Open the run dialogue box by pressing (Windows key + R), type the msconfig and click on the OK.
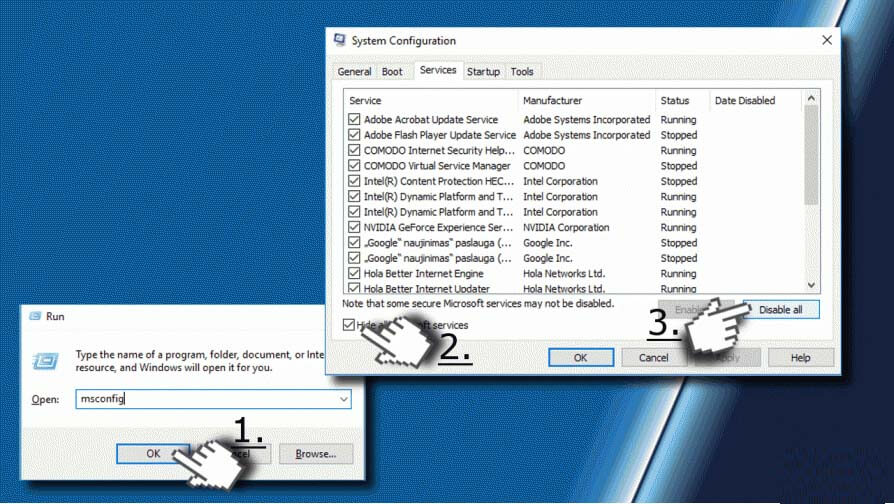
Step 2: This will open up the Configuration Window. Now you have to open the Services tab and mark the Hide all Microsoft services check box.
Step 3: Click on the Disable all and switch to the Startup tab.
Step 4: After it, click on the Open Task Manager link and go to the Startup tab. Now you have to click on each and every Startup item and choose Disable.
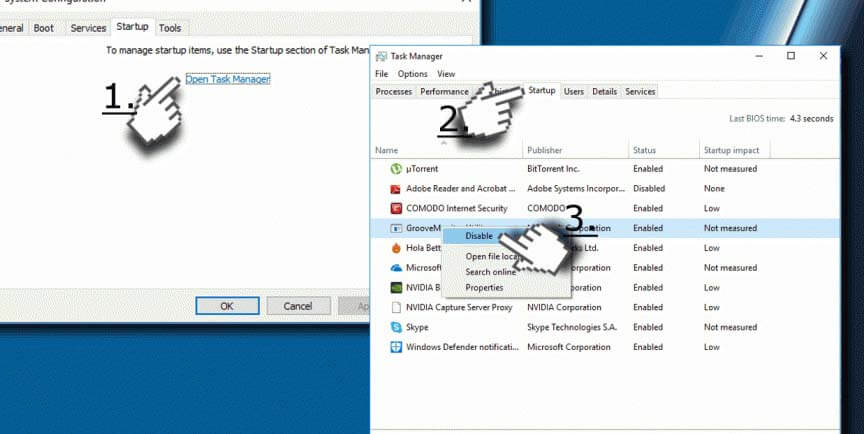
Step 5: At last, exit from the Task Manager and click on the OK on the System Configuration window. Restart your PC/Laptop.
Trick 3: Resetting Windows Update Components
To apply this trick you have to open the command prompt with the admin privilege. To do this, click on the Start button and type cmd then select open as an administrator option.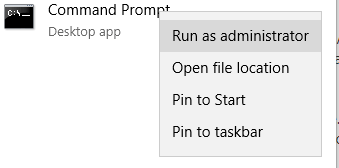
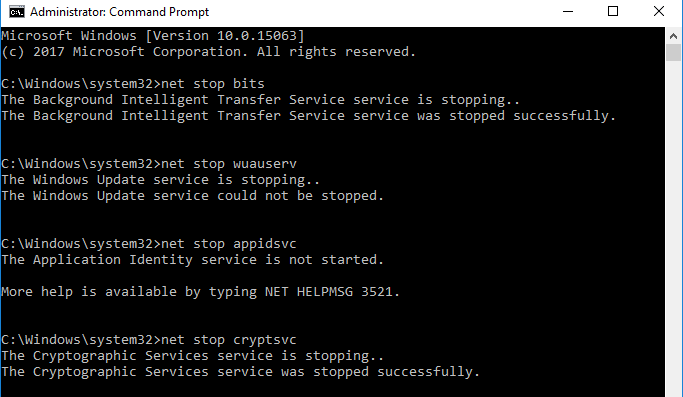
Now, you have to run the below-given commands one by one over the command prompt. These commands will stop the Windows Update related services. In order to run these separately, you have to hit the Enter key after each of the commands:
net stop bits
net stop wuauserv
net stop appidsvc
net stop cryptsvc
After stopping the Windows update services, now you have to rename the softwaredistribution folder backup copies. To do this, run the below-given commands one by one.
ren %systemroot%\SoftwareDistribution SoftwareDistribution.bak
ren %systemroot%\system32\catroot2 catroot2.bak
At last, start the Windows Update Services again that you stopped earlier. To do this you need to run these commands:
net start bits
net start wuauserv
net start appidsvc
net start cryptsvc
Reboot your PC or Laptop and try to upgrade your system.

No comments:
Post a Comment